Hello

Hello

Monday, February 29, 2016

Garlic Parmesan Roasted Cauliflower


Oh cauliflower,
Get in my oven with cheese
And garlic, please. Thanks.

That was a cauliflower haiku. And I copyrighted it so don't even think about it.....

Don't let terrible poetry stop you from making this easy and delicious recipe. This is great for meal prepping because it tastes great reheated. 

Pair it with your lean protein of choice and a green salad or a delicious Sweet Green Smoothie and you've got yourself a winning meal!

If you're low-carbing, you can add more cheese to increase the fat content.

6 simple ingredients:


Rinse and chop your cauliflower into florets and slice them to make them thinner.


Mix together your olive oil, garlic, onion salt, thyme, and salt and pepper.


Toss in the cauliflower.


Spread it onto a parchment paper-lined large rimmed baking sheet.


Roast. Sprinkle with Parmesan cheese.


Eat.


Garlic Parmesan Roasted Cauliflower

1 head cauliflower, cut into thin florets 
3 garlic cloves, minced
3 Tablespoons and 1 Teaspoon olive oil
2 Teaspoons onion powder 
1 Teaspoon dried thyme 
1/2 Cup grated Parmesan cheese
Salt and pepper to taste 

Preheat oven to 425 degrees Fahrenheit. Place parchment paper onto large baking sheet. 

In a large bowl, combine cauliflower florets, garlic, olive oil, onion powder, thyme, and salt and pepper. Spread onto prepared baking sheet.

Roast at 450 degrees Fahrenheit for 40 minutes, stirring the cauliflower every 10 minutes. Remove from oven and sprinkle with Parmesan and roast for 10 more minutes.

Saturday, February 27, 2016

Roasted Sweet Potatoes and String Beans


First order of business: string beans = green beans = snap beans. I just felt like calling green beans/snap beans string beans today. Say that 5 times fast.


The story behind this roasted medley is that I bought fresh string beans with plans to sauté them with garlic and butter, but ended up not feeling like doing that. I also needed to use the sweet potatoes that I had bought. 

Now, I've roasted sweet potatoes and Brussels sprouts together before (yum!), but sweet potatoes and string beans...this was a new combo for me. And I'm so glad I tried it. This medley is very tasty!...

and super easy! Just wash and cut/snap your string beans. 


Then wash and peel your sweet potato(es). Depending on their size, you may end up using one very large sweet potato or two medium. Exact size/weight is not crucial. I used 1.5 pounds of sweet potato to 1 pound of green beans this time, and you can certainly modify the ratio to suit your preferences.


Cut your sweet potato(es) into little sticks close to the size of your string beans.


Put your vegetables into a large mixing bowl.


Add minced garlic, olive oil and salt and pepper. Toss to ensure all the vegetables are coated.


Spread vegetables onto a dark nonstick large rimmed baking sheet.
(Full disclosure: I cheat by lining my baking sheet with parchment paper, making sure no paper is hanging over the edges of the baking sheet, as the paper will burn at this high temperature; I also keep my oven light on and monitor it very carefully. I live on the edge in order to make clean up easier!)


Bake at 425 degrees Fahrenheit for 20 minutes. Flip with spatula. Continue baking until sweet potatoes are slightly golden (but not shriveled up or burnt!), about 15-25 more minutes.


Serve with some protein and fruit. Enjoy!


Roasted Sweet Potatoes and String Beans

1.5 Pounds sweet potatoes, peeled and cut into sticks
1 Pound fresh string beans, snapped/cut
1 garlic clove, minced
3 Tablespoons olive oil 
Salt and pepper to taste 

Preheat oven to 425 degrees Fahrenheit.
 
Place sweet potato sticks and string beans into large bowl and toss with garlic, olive oil and salt and pepper. Spread vegetables onto prepared baking sheet. They may slightly overlap, but do not pile them; it may be necessary to bake 2 batches if you have too many vegetables. Please see pictures above to see what I mean by slightly overlapping.

Place baking sheet on middle rack in the oven and bake for 20 minutes at 425 degrees Fahrenheit. Remove from oven and flip vegetables with spatula, then bake for another 15 to 25 until sweet potatoes are slightly golden.

Tuesday, February 23, 2016

Sweet Green Smoothie


Remember when you first got your turbo blender (probably for Christmas) and you pinned all those smoothie recipes on Pinterest and you were like, "I'm going to drink smoothies all the time" and you bought a whole bunch of fruits and vegetables and you felt so healthy and cool? What happened?

This smoothie helps me get back to that. This is my go-to smoothie. To be fair, it's actually my handsome husband's recipe. And since what's "his is mine" I like to think of this as my go-to green smoothie (see how I did that?). It's my go-to because it's easy, delicious, healthy, and I never seem to get tired of it. One of the things that makes this smoothie easy is that I get all of the ingredients from Costco and most of the fruit is frozen.


When it comes to making smoothies, easy is a must for me. If it's not easy, forget it, I'll just eat the fruit. Forget the smoothie. Bye.

Picking locally grown fresh organic fruits and vegetables at their peak of ripeness is a great plan, and I'm not knocking that at all. But my daily schedule doesn't allow for that most days ever. So what I love about this smoothie is that all I have to do is grab my frozen strawberries and mangoes from the deep freezer, pull the spinach and kale out of the fridge, peel an orange, and I'm all set.


By the way, this is my easy method of peeling an orange. For when you don't have time to grow your fingernails long enough to peel it the old fashioned way.


I use my Vitamix 5200 to make this smoothie. If you make a lot of smoothies the Vitamix is a wise investment. I highly recommend it. I also use the Vitamix to make baby food purees for my baby girl. This beast of a machine pulverizes all of your ingredients into a perfectly smooth smoothie, and it just makes the whole process so much easier. And like I said, easy is a must for my smoothies. But this smoothie can be made in any food processor, just follow the manufacturuer's directions.


Coconut water versus filtered drinking water...well the coconut water has tons of nutritional benefits. If you don't care for the taste of coconut water, I highly doubt that you will taste it in this smoothie. Your taste buds will think you just used regular old water, but your body will be able to enjoy the benefits of the potassium-powerhouse, hydrating, wonderful coconut water. If you don't have coconut water (which you can also pick up for a good price at Costco), don't let that stop you from making this smoothie. I never let it stop me!


Drink this smoothie for breakfast, as a snack, with lunch, with dinner, or whenever you want. I used to pour it in my blender bottle and drink it on the way to work. To prevent the ingredients from separating and to prevent the smoothie from becoming warm, drink it relatively quickly, in about 30 minutes or less. If this yields too much smoothie for you, just divide the recipe in half to make half the amount.


Sweet Green Smoothie

Yield: about 3 1/2 cups

2 large handfuls of fresh spinach
1 large handfuls of fresh baby kale
1 orange, peeled and quartered
1 cup frozen strawberries
1 cup frozen mango chunks
1 cup coconut water or filtered drinking water

Put water and loosely packed greens into the Vitamix and pulverize. Add the orange quarters and pulverize. Add the frozen mangoes and pulverize. Then add the frozen strawberries and pulverize. Add more water if needed. If you are using a machine other than the Vitamix please follow the manufacturer's directions for best results (and so that you don't break your machine!).

Tuesday, February 16, 2016

Citrus Dijon Tofu


Who said meat, poultry and fish get to have all the fun? I wanted to make a citrus marinade for my tofu - my other white meat. This combination of flavors is tangy-savory-sour, within just the right amount of zest for a refreshing dinner on a warm evening (or a cool evening, or afternoon, or morning, or middle of the night...).

Okay, let's do this:

First, lets drain that tofu. Remove the tofu from the packaging and place on top of some folded paper towels. Place more folded paper towels on top of the tofu and gently press down to allow the towels to absorb the water. You can use clean dish towels instead if you like because tofu contains a lot of water that we don't need for this recipe. Continue pressing the tofu, changing the paper towels/dish towels as they become soaked, until the tofu is not so wet. Don't worry about getting ALL of the water out, we're just trying to dry it out a little. Then cut the tofu into equally-sized rectangular pieces about 1x2 inches. Carefully place the tofu pieces into a ziplock bag.


Can we give a quick shout out to lemon zest? It plays a leading role in this dish. The strong lemony aroma you smell while zesting the lemon actually promotes happiness. Lemon is a refreshing, uplifting food. Zesting can be annoying, and maybe even a little dangerous (be careful not to zest your knuckles!) but it's oh so worth it to get as much zest as you can from your lemon for this recipe. Aim for about 1 and a half tablespoons.


Next, we combine 3 tablespoons of the olive oil and the rest of the ingredients for the marinade, except for the cornstarch. We'll use the cornstarch later when we give the tofu a nice little sauce. Stir the ingredients in a bowl and pour into the ziplock bag with the tofu.


Allow to marinate in the refrigerator for at least 1 hour. 

Side story/rabbit trail: I actually marinated mine for about 7 hours! I was really excited to make it and didn't want to risk the chance of running out of time, so I started marinating it first thing in the morning. It turned out deliciously! So technically, if you want what I got, you'll need to do what I did...a 7 hour marinade. 

But you may not have 7 spare hours to let your tofu marinate. And that's okay! Give it at least an hour; longer if you can. The longer it marinates, the more the tofu is able to become infused with all of those wonderful flavors we just added to it. 

Heat 2 tablespoons of olive oil in a nonstick pan over medium heat. Add the tofu pieces, reserving the leftover marinade juices for later. Cook for about 2 minutes on each side or until tofu is brown. I suggest using silicone tongs to flip the tofu. Combine the cornstarch with 1 tablespoon of water and set aside.

When the tofu is browned on all sides, decrease heat to medium-low and pour the reserved marinade into the pan with the tofu. Pour the cornstarch-water mixture into the pan also, tossing and gently stirring until a sauce forms and thickens, about 1-2 minutes. Remove from heat and enjoy!

This pairs exceptionally well with grilled asparagus and a fresh salad.


Zest Warning: this recipe is loaded with lemon-lime flavor. Feel free to use less lemon zest and citrus juices if you prefer less citrus.

Citrus Dijon Tofu

5 Tablespoons olive oil
2 Tablespoons onion, minced
1 garlic clove, minced
1 lemon, zested and juiced
1 large lime, juiced 
1 Tablespoon soy sauce 
1 Tablespoon Dijon mustard 
1/2 Teaspoon ground black pepper 
2 Teaspoons cornstarch

1. Remove tofu from packaging and remove excess water from tofu by gently pressing between paper towels or clean dish towels. Cut into equally-sized rectangles about 1x2 inches in size. Carefully place in ziplock bag.

2. Combine 3 tablespoons olive oil, onion, garlic, lemon zest, lemon juice, lime juice, soy sauce, dijon mustard and ground black pepper in a bowl. Stir and pour into the ziplock with the tofu.

3. Marinate in the refrigerator for 1-7 hours. 

4. Heat 2 tablespoon of olive oil in a nonstick pan over medium heat. Add the tofu, reserving the leftover marinade juices for later. Stir fry until the tofu is browned on all sides, about 10 minutes. Combine cornstarch with 1 tablespoon of water and set aside.

5. Pour the reserved marinade into the pan with the tofu. Pour the cornstarch-water mixture into the pan, tossing and stirring gently until a sauce forms and thickens, about 1-2 minutes. Remove from heat and enjoy!

Please let me know what you think of this recipe in the Comments section below or on Instagram: @howtogetawaywithcooking.

Monday, February 15, 2016

Veggie Egg White Scramble


What better way to pack veggies into your diet than to start off with some delicious veggies bright and early in the morning? Veggie egg white scrambles are one of my very favorite breakfast meals. They taste great and they're so good for you. Lots of nutrient-rich veggies, protein-packed egg whites, and calcium-packed cheese (which also helps provide the necessary fat and flavor to help make this meal complete). 


This particular recipe is from yesterday morning when I was hungry but hadn't yet made it to the store to do my weekly grocery shopping. I used some vegetables that I had neglected to use over the past week - those last few mushrooms, that yellow squash that I had completely forgotten about, some spinach leaves that were nearing their final days, some red onion (I always have onions on hand), and that last little handful of shredded mozzarella. 


You can use what ever vegetables to like. And don't be shy - use a bunch. Endulge in all those yummy nutrients. Throw in some dried or fresh parsley if you like. 

Remember to also start your morning off with lots of water and to drink water all throughout the day. I keep a big water bottle by my bed and take a huge drink right when I wake up. By noon I've usually drank at least a half gallon. Make water goals for yourself. It will really make all the difference in the way you look, feel, think, and eat. 

But anyway, back to this scramble. I hope that you love it and that you find delicious veggie combinations to use in your own scrambles. You'll notice that I don't specify the amounts of the ingredients. That's because the basic rule is: use lots of veggies. Personally, in the midst of my early morning hunger I'm not going to trouble myself with measuring things. Plus, you can't have too many veggies.

So pour yourself a nice big glass of water (squeeze a lemon in there for extra credit!) and start chopping veggies. 


Veggie Egg White Scramble 

Approximately 4 egg whites
Olive oil
Mushrooms, chopped
Spinach, chopped
Red onion, chopped
Yellow squash, chopped
Mozzarella cheese, shredded
Salt & pepper to taste

Heat olive oil over medium heat and add vegetables. Cook until onion and squash are clear. Pour egg whites over vegetables and allow to sit undisturbed and cook for about 3 minutes before scrambling. Cook until egg whites are done. Add salt and pepper to taste. Serve with cheese sprinkled on top.

Saturday, February 13, 2016

Zesty Lemon-Garlic Vinaigrette


If you're going to be eating a lot of salads you have got to keep them interesting. Got to. Salad dressing is fun because there are so many different flavors to choose from.

Full disclosure: there's always a bottle of Ken's Ranch Dressing in my refrigerator (...and an unopened bottle in my pantry as back-up). Hey, the man knew his way around a salad bowl!


But I also like to whip up my own dressings. This Zesty Lemon-Garlic Vinaigrette is an old favorite. It's simple and delicious. Enjoy it with a simple romaine and tomato salad or drizzle it over some fresh spinach leaves. It also makes a lovely Greek or Mediterranean salad dressing.


If you're feeling zesty yourself, substitute another dried herb for the oregano. See how you like parsley, rosemary, marjoram, or basil. Have fun with it.


My tip to you: If you're not doing so already, start stocking your pantry with dried herbs, spices, seasonings, vinegars and such. That way you will have everything you need when you want to make a marinade or dressing. It's so wonderful when you find a recipe that you want to make and you realize that you already have everything you need to make it. 

Look for sales on spices at the grocery store. The more expensive brands, usually packaged in glass bottles, are great. Quality ingredients = quality food. But if your grocery budget is tight you can purchase inexpensive generic brands at grocery stores, drug stores or the dollar store. Better yet, buy a spice rack so you will have some basic spices to work with. Buy spices that you've never tried before and search for recipes that call for those new spices. 

I also recommend buying a good brand (I use Christopher Ranch) of minced garlic to keep in your refrigerator, especially if you're a garlic lover like me. (If I hand-minced all the garlic I use in a typical week I'd have carpal tunnel!) Lemon juice concentrate and lime juice concentrate are two other staples in my refrigerator.

Have fun!


Zesty Lemon-Garlic Vinaigrette

Yield: 4 servings (2 Tbsp servings)

6 Tablespoons extra virgin olive oil
2 Tablespoons fresh lemon juice
1 Teaspoon red wine vinegar
1 Teaspoon salt
1 Clove garlic, minced 
1/2 Teaspoon dried oregano
1/4 Teaspoon ground pepper

1. Whisk all ingredients together. Pour over your salad.

2. Now wasn't that easy? 

3. Be sure to shake/whisk before pouring on your salad, as the oil and other liquids will separate. Store in an airtight container in your refrigerator for up to 2 days.

Friday, February 12, 2016

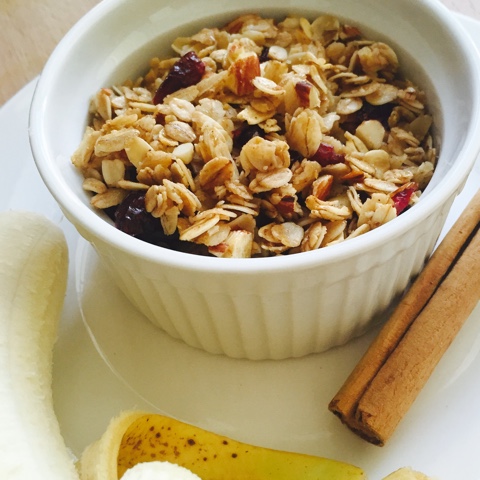
Crunchy Cranberry Almond Granola


Oatmeal, healthy fats, fiber-infused cranberries...

Oh hello! I was just making a list of healthy things about granola. We know it's delicious, that's for sure. But let's not forget that it's also good for you.

Enjoy this sprinkled atop some Greek yogurt or fruit. It's hard damn near impossible impossible to stop eating this granola! It's perfectly buttery, crunchy, sweet, savory and oh so hard to keep away from your lips!

Homemade granola is one of my favorite things. It's way cheaper than store-bought and it tastes better too. Plus, I usually have all the ingredients I need to make a huge batch of my own.


So, a few ingredients from the cabinet, a mixing bowl, a cookie sheet. And boom! Granola.


You can add whatever fruits and nuts you like. If you don't have fruit or nuts and don't feel like going to the store to buy any, just make a delicious batch of basic granola. Why can't everything in life be this simple? 


Crunchy Cranberry Almond Granola


  • 1. Preheat your oven to 310 degrees F. Place parchment paper on a large cookie sheet.

  • 2. Place the rolled oats and almonds into a large bowl.

  • 3. Place the coconut oil and honey into microwave safe bowl and microwave for 30 seconds. Stir in the brown sugar and microwave for another 30 seconds. Stir in the vanilla extract, cinnamon and salt. 

  • 4. Combine and stir the liquid ingredients with the dry ingredients in the large mixing bowl. 

  • 5. Spread the mixture onto your prepared cookie sheet and bake for 30 minutes on the middle rack of your oven, removing from the oven to stir every 10 minutes. 

  • 6. Stir in the cranberries at the last 5 minutes of cooking time. 

  • 7. Remove the granola from the oven and allow to cool and harden on the cookie sheet. Break into clusters. Taste it. Fall in love. Pat yourself on the back. Store in an airtight container (ziplock bag, glass or plastic storage container) for up to 4 weeks...but it will be gone by the end of this week. Promise.

Tuesday, February 9, 2016

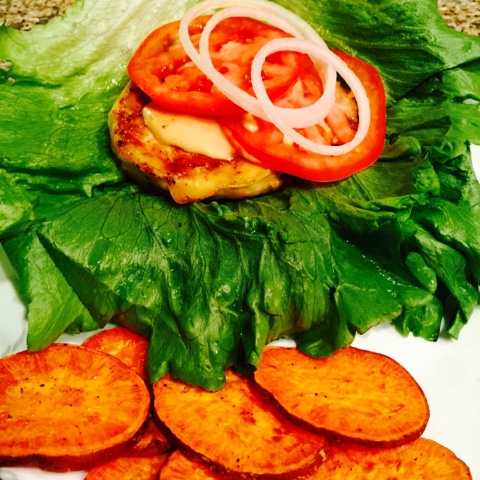
Roasted Sweet Potato Coins


Sweet potatoes don't need you to do too much to them. They're amazing already. These sweet little treats just need a little olive oil, salt & pepper and some alone time in the oven.


I like using the dark orange sweet potatoes, sometimes (incorrectly) referred to as yams. They vary in size. This one pictured  above is pretty huge, so one of these was more than enough for two servings. Don't worry if you think you're making too many sweet potato coins because they tend to disappear like French fries. In fact, they actually taste like sweet potato fries, they're just shaped like coins. 

If your slices are too thick your sweet potato coins will be mushy. If your slices are too thin your poor little coins will burn. 1/2 inch thickness is the size to aim for. 

Adjust the olive oil as needed. While you don't need to drown them in oil, you do want them to be well-coated. I just put the sweet potatoes in a large mixing bowl and used my hands to rub the oil on, then sprinkled them with salt and pepper.


The only bad news is that you will probably need to bake 2 or 3 batches because when you place them on the baking sheet they cannot be piled on top of each other. But again, these babies are so delicious that they're definitely worth making several batches.


Bake them at 400 degrees for 15 minutes. Flip. Another 15 minutes. Then another 5 to 10 minutes at 450 degrees. They will dry out a little and get crispy as you let them cool, so don't worry if they seem kind of soft and not crispy enough when you remove them from the oven. 


Try these with a lettuce-wrapped turkey burger. It's a good time.


Roasted Sweet Potato Coins

2 medium sweet potatoes 
2 Tablespoons of olive oil
Salt and pepper to taste  

Preheat oven to 400 degrees. Line a baking sheet with parchment paper. 

Scrub and wash the sweet potatoes. Leave the skin on. Cut them into 1/2 inch thick coins. Brush/rub both sides with olive oil and sprinkle with salt and pepper. Place coins on baking sheet, not overlapping. 

Bake for 15 minutes. Carefully flip each coin over. Bake for another 15 minutes. Increase oven temperature to 450 degrees and bake for another 10-15 minutes until the coins are brown and slightly crispy. 

Want a sweeter flavor? Swap the salt and pepper for sugar and cinnamon. Yum.